
bonavita crib assembly instructions
Welcome to the comprehensive guide for assembling your Bonavita crib. This guide will walk you through the process using a Phillips screwdriver and Allen wrench. Bonavita cribs are versatile, converting from a crib to a toddler bed, daybed, and full-size bed. Proper assembly ensures safety and durability, though some users have reported difficulty finding original instructions due to the company being out of business.
Overview of Bonavita Cribs
Bonavita cribs are renowned for their durability, safety, and stylish designs, making them a popular choice for parents. These cribs are crafted from high-quality natural wood, ensuring a timeless aesthetic while adhering to safety standards. Many Bonavita cribs are versatile, offering conversions from a crib to a toddler bed, daybed, or even a full-size bed, providing long-term value. Despite the company being out of business, their products remain sought after for their reliability and functionality. Assembly requires careful attention to detail, with essential tools like a Phillips screwdriver and Allen wrench. Proper assembly ensures the crib’s stability and safety, making it a secure environment for your child. Users often praise the ease of setup, though some have noted challenges in locating original instructions. Bonavita cribs continue to be a trusted option for families, offering both practicality and elegance.
Importance of Proper Assembly
Proper assembly of your Bonavita crib is crucial for ensuring the safety and well-being of your child. Incorrect assembly can lead to structural instability, posing serious risks such as collapses or entrapment. Adhering to the provided instructions guarantees that all components are securely fastened, minimizing potential hazards. Additionally, correct assembly ensures compliance with safety standards, which are designed to protect infants from harm. Improperly assembled cribs may fail to meet these standards, increasing the likelihood of accidents. Taking the time to follow each step carefully is essential, as shortcuts or oversights can compromise the crib’s integrity. By assembling the crib correctly, you create a safe and durable environment for your child to sleep and grow. Always double-check each step and tighten all bolts thoroughly to ensure long-term stability and safety. Proper assembly is an investment in your child’s security and peace of mind.
Preparation for Assembly
Begin by gathering all tools and materials, including a Phillips screwdriver and Allen wrench. Organize crib components and hardware from the packaging. Read instructions carefully to ensure all parts are included and understood before starting.
Tools and Materials Needed
To assemble your Bonavita crib, you’ll need a Phillips screwdriver and an Allen wrench, both essential for securing bolts and screws. These tools are typically included in the hardware box or can be found in most toolkits. Additionally, ensure all hardware components, such as bolts, screws, and washers, are accounted for from the packaging. A soft cloth may be handy to protect the crib’s finish during assembly. Avoid using power tools, as they could strip screws or damage the wood. Organize all parts and hardware beforehand to streamline the process. Finally, locate the assembly instructions, either from the original packaging or by downloading a PDF manual online, to guide you through each step. Proper preparation ensures a smooth and safe assembly experience.
Essential Tools: Phillips Screwdriver and Allen Wrench
The primary tools required for assembling your Bonavita crib are a Phillips screwdriver and an Allen wrench. These tools are crucial for securely fastening bolts and screws throughout the assembly process. The Phillips screwdriver is necessary for driving screws into wood, ensuring a sturdy frame. Meanwhile, the Allen wrench is used to tighten bolts, providing stability to the crib’s structure. Both tools are typically included in the hardware box provided with the crib. If not included, they are readily available at most hardware stores. It’s important to avoid using power tools, as they may strip screws or damage the crib’s finish. Always ensure the tools are in good condition to prevent any assembly issues. Proper use of these tools will ensure a safe and durable crib for your child.
Additional Materials: Hardware and Instructions
In addition to the essential tools, proper assembly of your Bonavita crib requires specific hardware and clear instructions. The hardware box included with the crib contains all necessary bolts, screws, and brackets. Ensure all parts are accounted for before starting assembly. The instructions, often provided as a booklet or PDF, guide you through each step. They include diagrams and detailed directions to ensure a secure and correct assembly. If the physical instructions are missing, digital versions can often be found online. Double-checking the hardware against the parts list is crucial to avoid missing pieces. Proper organization of materials will streamline the assembly process, ensuring a safe and functional crib. Always refer to the instructions for specific hardware requirements and assembly sequences.

Step-by-Step Assembly Guide
Follow this step-by-step guide to assemble your Bonavita crib securely. Use a Phillips screwdriver and Allen wrench as instructed for a safe and sturdy setup.
Unpacking and Organizing Components

Begin by carefully unpacking all components from the Bonavita crib box. Ensure no damage occurred during shipping and all parts are accounted for. Check the original packaging for an assembly manual or instructions, as they are essential for proper setup. Use the provided hardware list to verify all items, such as screws, bolts, and rails, are included. Organize the components on a clean, flat surface to avoid losing small parts. Separate the crib frame, mattress support, side rails, and toddler rail for easier access during assembly. Use the included Allen wrench and a Phillips screwdriver to prepare for the next steps. Before starting, double-check that all parts are labeled and match the instructions. This step ensures a smooth and efficient assembly process. For additional clarity, refer to the PDF instructions for detailed visuals and part identification.
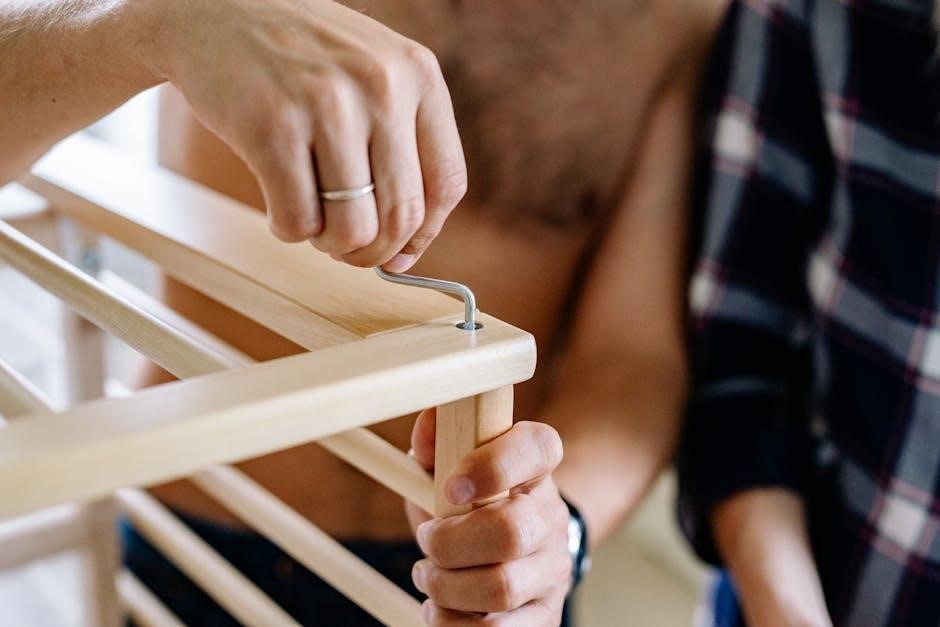
Assembling the Crib Frame

Start by assembling the crib frame, which forms the base structure. Attach the legs to the crib base using the bolts provided. Ensure the legs are evenly spaced and securely tightened with the Allen wrench. Next, connect the side panels to the crib frame by aligning the pre-drilled holes and inserting the screws. Use the Phillips screwdriver to tighten these screws firmly. Make sure the frame is level and stable before proceeding. Pay attention to the alignment of the side rails and the mattress support brackets, as these are critical for safety. Tighten all bolts gradually, ensuring even pressure to avoid warping the wood. If unsure, refer to the assembly manual or the PDF instructions for visual guidance. Properly assembled, the crib frame will provide a sturdy foundation for the rest of the crib.
Attaching Mattress Support and Side Rails
After assembling the crib frame, attach the mattress support. Align the support brackets with the frame and secure them using the provided bolts. Tighten firmly with the Allen wrench. Next, attach the side rails by inserting the screws into the pre-drilled holes. Use the Phillips screwdriver to tighten these screws, ensuring the rails are level and properly aligned. Double-check the tightness of all bolts to ensure stability. Properly securing the mattress support and side rails is crucial for the crib’s structural integrity and your baby’s safety. If the mattress support is not level, adjust the bolts accordingly. Once complete, the crib should feel sturdy and ready for the mattress. Always refer to the assembly manual or PDF instructions for specific guidance on aligning these parts correctly.
Securing the Toddler Rail
Attach the toddler rail to the crib by aligning its pre-drilled holes with the frame. Use the Allen wrench to tighten the bolts securely. Ensure the rail is level and evenly spaced. Tighten the bolts firmly, but avoid overtightening, as this could damage the wood. Double-check the alignment to ensure the rail is flush with the crib sides. Once secured, test the rail’s stability by gently rocking it to ensure it doesn’t wobble. Properly attaching the toddler rail is essential for transitioning your crib into a toddler bed. If the rail feels loose, re-tighten the bolts and verify the alignment. This step ensures the crib’s safety and functionality as your child grows.
Final Tightening of All Bolts
After completing the assembly, perform a final check by tightening all bolts firmly. Use the Allen wrench to ensure each bolt is secure but not over-tightened, which could damage the wood. Start with the crib frame, then move to the mattress support and side rails. Double-check the toddler rail connections to ensure stability. Verify that all joints are flush and even, with no gaps or misalignments. Once tightened, gently rock the crib to confirm there’s no wobbling. This step ensures the crib’s structural integrity and safety for your child. Properly tightened bolts prevent loose parts and potential hazards. After final tightening, inspect the crib to ensure all components are securely in place and functioning as intended.

Troubleshooting Common Issues

Address missing parts by rechecking hardware. Clarify unclear instructions by referencing online guides. Correct alignment issues by adjusting parts carefully for a secure, stable crib assembly.
Identifying and Solving Missing Parts
Start by thoroughly checking the packaging and hardware box to ensure no parts are overlooked. If components are missing, contact customer support or the retailer for assistance. Since Bonavita is out of business, reaching out to online communities or forums where users share instructions and solutions can be helpful. Some users have reported success in finding replacement parts or assembly guides through these platforms. If unable to locate official support, consider purchasing compatible hardware from a local store. Always verify the compatibility of any replacement parts with your crib model to ensure safety and proper assembly. If unsure, consult with a professional for assistance. Proper identification and resolution of missing parts are crucial for a secure and functional crib setup.
Dealing with Unclear Instructions
If the instructions are unclear, start by carefully reading the manual again to identify confusing sections. Break the assembly process into smaller, manageable steps to avoid overwhelm. Use online resources like forums or video tutorials for additional guidance, as many users have shared their experiences and tips for assembling Bonavita cribs. If specific instructions are ambiguous, focus on the diagrams or illustrations provided, as they often clarify the text. For critical steps, consider reaching out to customer support or communities where users discuss their assembly experiences. Remember, patience and attention to detail are key to overcoming unclear instructions and ensuring a safe, proper assembly of your Bonavita crib.
Aligning and Securing Parts Correctly
Aligning and securing parts correctly is crucial for the stability and safety of your Bonavita crib. Start by ensuring all components, such as the crib frame, side rails, and mattress support, are properly matched according to the instructions. Use the provided hardware, like bolts and screws, to secure each part tightly; Pay attention to alignment marks or pre-drilled holes, as these guide correct placement. Tighten all connections gradually to avoid misalignment or damage. If parts seem uneven, double-check their orientation and reposition as needed. For added stability, ensure the crib is placed on a level surface. After assembly, perform a final inspection to confirm all parts are securely fastened and properly aligned. This step ensures your crib is safe and durable for years to come.

Maintenance and Cleaning
Regularly inspect the crib for wear and tear. Clean with a damp cloth, avoiding harsh chemicals. Ensure all parts are dry before reassembling. Store disassembled components neatly.
Regular Maintenance Checks
Regular maintenance checks are crucial to ensure the crib remains safe and sturdy for your child. Inspect all bolts and screws periodically to ensure they are tightly secured. Check for any signs of wear, such as loose joints or damaged slats, and address them immediately. Use a Phillips screwdriver or Allen wrench to tighten any components that may have come loose over time. Additionally, examine the mattress support and side rails for stability. Clean the crib regularly with a damp cloth, avoiding harsh chemicals that could harm the finish or pose a risk to your baby. After cleaning, ensure all parts are completely dry before reassembling. For cribs that convert to toddler beds or full-size beds, pay extra attention to moving parts and hinges. Refer to the assembly manual for specific maintenance recommendations tailored to your Bonavita crib model.
Cleaning the Crib Safely
Cleaning the Bonavita crib safely is essential to maintain a hygienic environment for your baby. Start by removing any bedding or accessories and washing them according to their care instructions. For the crib itself, use a soft, damp cloth to wipe down all surfaces, paying special attention to areas around the mattress support and side rails. Avoid using harsh chemicals or abrasive cleaners, as they may damage the finish or leave harmful residues. For tougher stains, mix a mild detergent with warm water and gently scrub the area before rinsing with a clean, damp cloth. Ensure all parts are completely dry to prevent moisture buildup, which could lead to mold or warping. Regular cleaning not only keeps the crib looking new but also ensures your baby’s safety and comfort. Always refer to the manufacturer’s guidelines for specific cleaning recommendations.
Storage Tips for Disassembly
Proper storage of your disassembled Bonavita crib is crucial to preserve its condition and ensure easy reassembly. Begin by carefully disassembling the crib, taking note of each part and its corresponding hardware. Use the original packaging if available, as it provides the best protection. If the original packaging is unavailable, store each component in labeled boxes or bags to avoid confusion. Hardware such as screws and bolts should be kept in sealed containers to prevent loss or damage. Store all parts in a dry, cool area away from direct sunlight to prevent warping or discoloration. Consider labeling each box or bag with its contents and the date of storage for easy identification. By following these steps, you can maintain the integrity of your Bonavita crib and ensure it remains in excellent condition for future use.

Safety Guidelines and Regulations
Ensure your Bonavita crib meets safety standards by following assembly instructions precisely. Create a safe sleep environment with a firm, snug-fitting mattress and tight-fitting sheets. Regular checks prevent hazards.
Ensuring Compliance with Safety Standards
To ensure your Bonavita crib meets safety standards, follow the assembly instructions carefully and verify all components are securely fastened. Use only the provided hardware and avoid substitutions. The crib must have a firm, snug-fitting mattress, and bedding should be tight-fitting to prevent suffocation risks. Regularly inspect the crib for loose joints, scratches, or damage that could pose hazards. Check for any product recalls or updates from the manufacturer, as these are critical for maintaining safety. Always adhere to JPMA (Juvenile Products Manufacturers Association) or ASTM (American Society for Testing and Materials) guidelines for cribs. Proper assembly and maintenance ensure compliance with safety regulations, providing a secure environment for your child.
Checking for Recalls and Updates
Before and after assembling your Bonavita crib, it’s crucial to check for any recalls or safety updates. Visit the official Bonavita website or contact their customer support to verify if your crib model has been affected by any recalls. Additionally, register your crib with the manufacturer to receive notifications about potential issues or updates. In some cases, Bonavita cribs may have specific safety notices or repair kits available. If the company is no longer operational, check government databases like the U.S. Consumer Product Safety Commission (CPSC) for recall information. Regularly inspect your crib for any damage or wear and follow any recommended corrective actions. Staying informed ensures your crib remains safe and compliant with current safety standards.
Creating a Safe Sleep Environment
Creating a safe sleep environment for your baby is essential to ensure their well-being. Start by placing the Bonavita crib in a room with a consistent temperature and away from direct sunlight or drafts. Ensure the crib is positioned far from windows, curtains, and any loose bedding that could pose a hazard. Use a firm, tight-fitting mattress specifically designed for the Bonavita crib, and avoid adding soft bedding like pillows or blankets until your baby is older. Keep the crib free from toys or stuffed animals that could potentially cause suffocation. Always check that all sides of the crib are securely locked and that there are no gaps between the mattress and the crib frame. By following these guidelines, you can create a safe and comfortable space for your baby to sleep and grow.
Additional Resources and Support
Access online manuals, community forums, and customer support for assistance with Bonavita crib assembly. Replacement parts and troubleshooting guides are also available to ensure a smooth process.
Accessing Online Manuals and Guides
To ensure a smooth assembly process, accessing the correct manuals and guides is crucial. Visit the official Bonavita website or manufacturer’s support page for downloadable PDF instructions. Many cribs, such as the Bonavita Peyton Classic, have dedicated assembly guides available online. If the original packaging is missing, search for the specific crib model, like “Bonavita Sheffield Lifestyle Crib Instructions,” to find resources. Some users have shared their copies of manuals on community forums, which can be a helpful alternative. Additionally, check for troubleshooting guides and frequently asked questions (FAQs) sections on the manufacturer’s website. These resources often include tips for resolving common issues and ensuring proper assembly. Always verify the source to ensure accuracy and safety for your baby.
Community Forums and User Groups
Community forums and user groups are invaluable resources for Bonavita crib assembly. Many parents and DIY enthusiasts share their experiences, tips, and even copies of manuals online. Platforms like Facebook groups and Reddit often host discussions where users exchange advice and solutions for specific crib models, such as the Bonavita Peyton Classic or Sheffield Lifestyle crib. These communities can be especially helpful if original instructions are missing or unclear. Some users have uploaded their own copies of manuals, while others provide step-by-step guidance based on their assembly experiences. Additionally, these forums often include troubleshooting tips and creative solutions to common issues. Engaging with these groups can provide reassurance and practical support, ensuring your crib is assembled safely and correctly. They also highlight the importance of collaboration and shared knowledge in overcoming assembly challenges.
Customer Support and Replacement Parts
For Bonavita crib assembly, customer support and replacement parts can be challenging due to the company being out of business. However, many online resources and communities offer assistance. Manufacturer websites often provide PDF versions of assembly manuals, which can be downloaded for free. Additionally, some users have shared their own copies of instructions on forums and social media groups. If you encounter missing parts or unclear instructions, these communities can be a valuable resource. Replacement hardware, such as screws or bolts, may be available through third-party sellers or home improvement stores. Always verify compatibility before purchasing. If you cannot find official support, reaching out to DIY enthusiasts or local furniture assemblers might be a practical solution. Remember to double-check your packaging for any overlooked parts before seeking external help.
With proper assembly, your Bonavita crib will provide a safe and comfortable space for your baby. Ensure all steps are followed for durability and safety. Enjoy!
Final Checks and Inspection
After completing the assembly, perform a thorough inspection to ensure all parts are securely fastened and properly aligned. Double-check that all bolts are tightened firmly, especially the mattress support and side rails. Verify that the crib meets safety standards, with no gaps or loose connections. Test the crib’s stability by gently rocking it to ensure it doesn’t wobble. If converting to a toddler bed or other configurations, confirm the transition is smooth and secure. Refer back to the instructions to ensure no steps were missed. Finally, place a mattress that fits snugly within the crib frame and add bedding suitable for a safe sleep environment. Your Bonavita crib is now ready for your baby, providing a sturdy and comfortable space for years to come.
Enjoying Your Assembled Bonavita Crib
Once your Bonavita crib is fully assembled and inspected, it’s time to enjoy the fruits of your labor. This versatile crib is designed to grow with your child, converting seamlessly from a crib to a toddler bed, daybed, and even a full-size bed. Its natural wood construction and sturdy design ensure it will remain a reliable piece of furniture for years. Place a firm, snug-fitting mattress and add soft, breathable bedding to create a comfortable and safe sleep environment. The crib’s classic design will complement any nursery decor, while its functionality will adapt to your child’s changing needs. Take pride in knowing you’ve built a safe and cozy space for your little one to rest and grow.
Related Posts

perdue chicken strips cooking instructions
Craving delicious Purdue chicken strips? We’ve got the *ultimate* guide to cooking them to golden, crispy perfection – oven, air fryer, or skillet! Get cooking now!

what instructional coaching is and is not
Discover the ins and outs of instructional coaching! Learn how it transforms teaching and student learning with expert strategies and practical tips.

tyson chicken nuggets cooking instructions
Learn how to cook Tyson chicken nuggets perfectly every time! Get quick, easy, and delicious cooking instructions here.